How to make Sri Lanka’s anagi II stove
Practical Action
Appendix 3. Making the moulds
Making plaster moulds is best learned from an experienced mould maker. The following
instructions can serve as a guide.
The moulds for the smaller attached pieces on the Anagi stove are made of plaster of paris.
The moulds are cast from a master mould, which can be made from wood or plaster. A
temporary master mould can be made from clay by forming pieces just like you wish to make
using the moulds, and laying them on a sheet of glass or a slab of clay.
1 The master moulds are set on a
table with slabs of clay used to form
walls where necessary.
2 The master moulds are coated with
oil, or with liquid soap, or with clay
slip, to keep the poured plaster
from sticking to them. Only when
the moulds are ready can the
plaster be mixed.
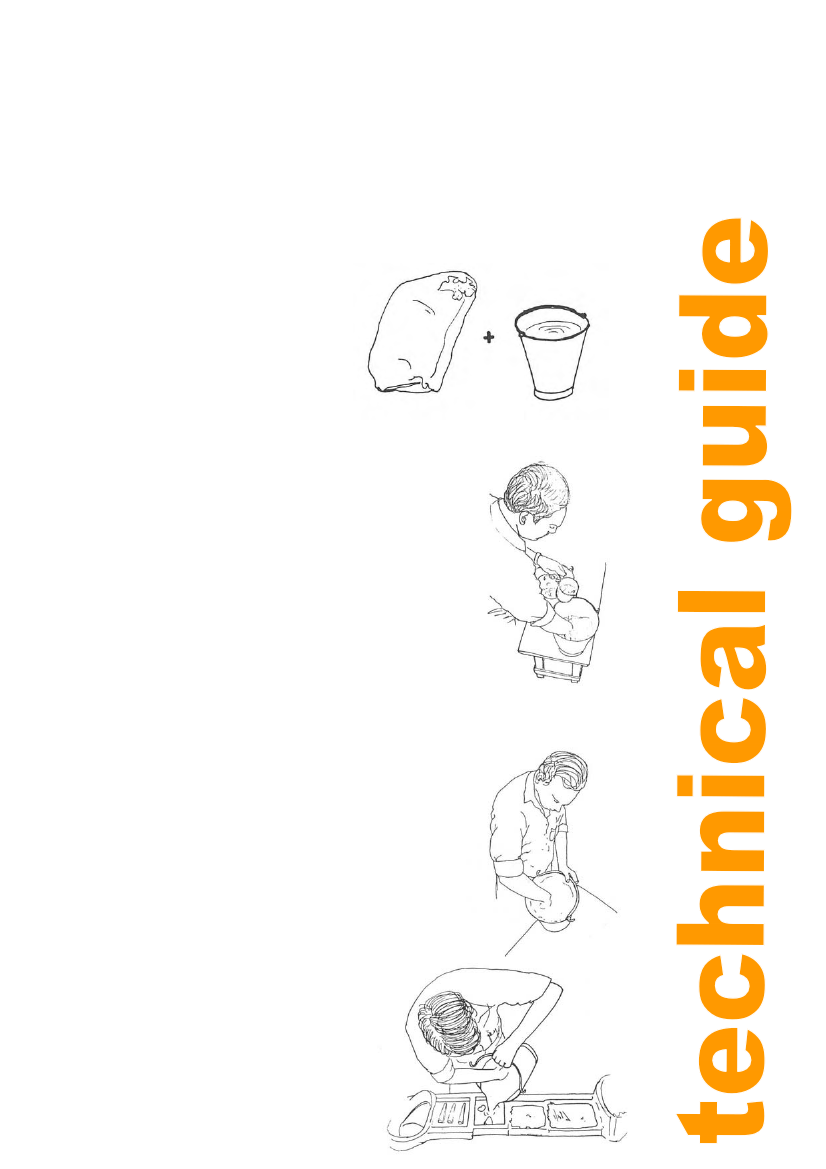
3 Fresh, dry plaster of Paris is mixed with clean water.
The proportions are roughly equal, but the only
practical accurate measurement is by acquiring a feel
for the consistency. If too much water is used, the
plaster will be soft and weak. If too much dry plaster
is used, the plaster will not pour smoothly and will
have a rough and uneven texture.
4 Add water to the plaster (or plaster to the water if you
prefer), mixing continuously with one hand. Add
ingredients until the mix has the consistency of heavy
cream. It is important to add the ingredients fairly
quickly, in less than one minute, but also carefully so
as not to add too much of one thing. If you are unsure
of your skill, make smaller batches of plaster (enough
for one mould).
5 Continue stirring the plaster and water with your hand.
It should thicken within a minute or two. When the
plaster starts to feel warm (due to a chemical
reaction), and it coats the hand like an opaque glove,
then it is ready to pour immediately.
6 Pour the plaster into the prepared moulds quickly,
scooping out the thickening plaster as needed. Pour
to the top of the moulds, avoiding making air bubbles.
Tap on the sides of the moulds to encourage air
bubbles to rise while the plaster is still liquid. Wash
hands immediately after pouring is finished!
7 Wait at least 1/2 hour until the plaster
has hardened, to remove the clay
walls. Tap on the joints to remove
wooden or plaster master moulds.
Clay master moulds are usually
destroyed while relieving them.
8 While the plaster is still damp, it is
soft enough to easily carve. Use a